You’re standing in front of your refrigerator with a bag of fresh groceries to unpack, but there’s no room to store your food. Do you stuff and squish everything into a tiny space and hope for the best? We’ve all been there, but the reality is it’s time for Project: Organize Refrigerator!
Cleaning your fridge and organizing food in the smartest sports can save you a lot of time and money. Since many families toss around 25% of all groceries purchased every year, getting your fridge organized can also help you prevent food waste and save a lot of cold cash. This step-by-step will guide you through the process and help you free your fridge.

Organize Refrigerator: Step One: Clear your shelves.
Pull up your sleeves and clear your kitchen counter top, ’cause it’s time to clear the shelves, empty the drawers, and brave whatever is hiding at the back of your fridge.
This step is all about finding items past the best-before date, searching for science projects (those plastic containers filled with forgotten food), and turning your fridge into a happy place to store tasty things.
Money Saving Tip: More space, less food waste. Removing forgotten food from your fridge creates more space for leftovers — plus your fresh food won’t be hidden from view and risk spoilage. Besides, spending money on your electrical bill to cool food you’ll never eat is a waste of cash.
Here’s how to get the job done:
1. Empty your fridge. Pull everything out of your refrigerator. To prevent good food from spoiling, be sure to stack your perishables in a cooler or a second fridge.

2. Scrutinize dates on packaged products. Not all dates are created equal — Best before, Display until, and Sell by all define different things, so your food could still be safe to eat after the magic date has passed. Yes, this is confusing. No, you don’t need to throw everything out.

What does ‘Best Before’ date really mean?:
- Display until, Sell by: Feel free to ignore these dates — they are for the store only, and don’t determine food quality.
- Best before: If the product is stored correctly, the manufacturer guarantees food to be in its prime before this date, and many foods are good afterwards. Best before doesn’t mean Worst after.
- Expiry date: Infant formula and physician prescribed diet aids have expiry dates and should not be consumed after expired. Add these items to your Food Waste Diary.
3. Leave the leftovers? If you’ve left your leftovers for longer than four days, the Mayo Clinic advises you toss them to prevent food poisoning.
If you’ve made too much dinner or can’t finish lunch within the four-day deadline, go ahead and freeze them right away.
4. Take a sniff? If something smells bad (unless it’s stinky cheese), toss it regardless of packaging dates or leftover age. However, just because something doesn’t smell bad doesn’t mean it’s good. The U.S. Department of Agriculture says illness-causing bacteria generally have no smell, and the Canadian Food Inspection Agency cautions consumers to never use their senses to judge the safety of food. “You cannot tell if a food may cause foodborne illness by its look, smell or taste.”
Step Two: Clean your fridge.
Have you been giving your fridge the cold shoulder on your weekend clean-ups? Yeah, since this wee announcement I’ve been guilty too.
Money Saving Tip: Clean up for big savings. A clean and well functioning fridge can be an open door to closing costs on food waste. A debris-free fridge can keep food at a constant temperature better than a cluttered mess, and a clean fridge makes your leftovers look more appealing to eat.
Since you’ve already emptied your refrigerator, now is a great time to get scrubbing. Here’s what to wipe:

1. Remove your drawers. Keep your pants on, but remove all fruit, vegetable, and deli drawers. Yes, your refrigerator drawers are likely a crumby mess. A small hand vac does wonders.

Like your rack and drawer placement? Stick a few Post-it Flags to mark shelf height and position before removing the lot — this makes putting your fridge back together easy.
2. Wipe, vacuum, scrub. Clear out crumbs and debris by wiping or vacuuming them away. Use a dab of dish soap in hot water and a soft rag to scrub and clean any ketchup drips and caked-on messes. Use a clean rag to dry the interior of your fridge.

Go ahead and soak fridge drawers, racks, and other cooling doodads in a sink filled with warm, sudsy water. Get those fridge gadgets shining!
3. Don’t forget the door seals! Vacuum and wipe all door seals — they often trap crumbs and other food bits which can cause refrigerator temperatures to fluctuate and food to spoil. Cracked and damaged fridge seals can also raise your energy bill, so consider replacing them.
4. Clear the perimeter. Look behind your fridge (where the dust bunnies live) and vacuum air vents, grills, condensers, and coils to remove all gunk (technical word) — this can improve fridge temperature regulation and lower your energy bill.
Wipe all kiddlet fingerprints and dog nose marks off the exterior. Plastic fridge doors wipe up well with warm water and a dash of dish soap. Those with a stainless steel exterior may require a streak-free cleaner — I use these stainless steel appliance wipes to protect my fridge.
5. Put the pieces back together. Go ahead and place all drawers, racks, bits, and pieces back into your fridge.

Everything should be gleaming.

Step Three: Store food in containers, label.
How old were those leftovers? What’s growing in that container? Don’t tell me you’ve never opened a low quality, throw-away, plastic container to find a former meal (turned science project) tucked in the nether regions of your fridge. Here’s how to end the moldy cycle:
1. Invest in quality, clear containers. Take the guesswork out of your dinner plate by using high quality, air-tight, glass containers to keep ingredients and leftovers fresh. Heating up leftovers is easy in a glass container, and since glass is see-through, you’ll stop wondering what’s hiding under the lid. Also, glass containers can stand the test of time, whereas those plastic throw-away 99-cent models often melt, become stained, and get chucked after a few uses.
The Glasslock 18-Piece Oven Safe Container Set is a budget-friendly way to get started.
If plastic is a better choice in your household ’cause you prefer a lighter container to pack lunches, try the Rubbermaid 42-Piece Food Storage Container Set in your kitchen.

I use both plastic and glass in my fridge.
Food Storage Tip: Use several smaller, flat containers rather than one massive one so leftovers can cool down more quickly. Smaller containers are also easier to stack in your freezer, and make for quick reheating later.
2. Label your leftovers. Grab a Sharpie and a stack of Post-it Notes, and write the date on each container. Remember: The Mayo Clinic says you shouldn’t keep leftovers for more than four days!

Food Storage Tip: Store your leftovers at the front of the fridge at eye level so you can see them (and eat them) before they spoil.
3. Combine the odds and ends. How many ketchup or salad dressing bottles do you have on the go? When too many condiments are eating into your refrigerator space, it’s time to combine the lot into a single container.

Hello, Mr. Newman? I love your dressing, so I’m moving the leftovers to a single bottle to save space.

A massive Costco-sized jar of sauerkraut is condensed into a small glass container to encourage taking it to work for lunch.
4. Sort fruits and vegetables. One bad apple spoils the lot, so every week I sort through my produce and cull the good from the bad.

Remove the bruised bits and keep the good pieces in a container to preserve freshness. These strawberries became a refreshing snack after I finished my fridge cleanup.

Not all vegetables come in fancy branded packaging. After visiting the local farmers’ market, I stored my broccoli and peppers in quality Ziploc resealable bags and used a sheet of paper towel to absorb moisture. I rinse and reuse these bags every week.

Placing chopped lettuce or loose spinach in a salad spinner can help keep salads fresh.
Food Waste Tip: Most fruit, vegetables, and meat products come prepackaged in a resealable freshness bag, so there’s no need to repackage these items. Repackaging cold cuts and some meats may expose them to bacteria, which increases the chances of spoilage.
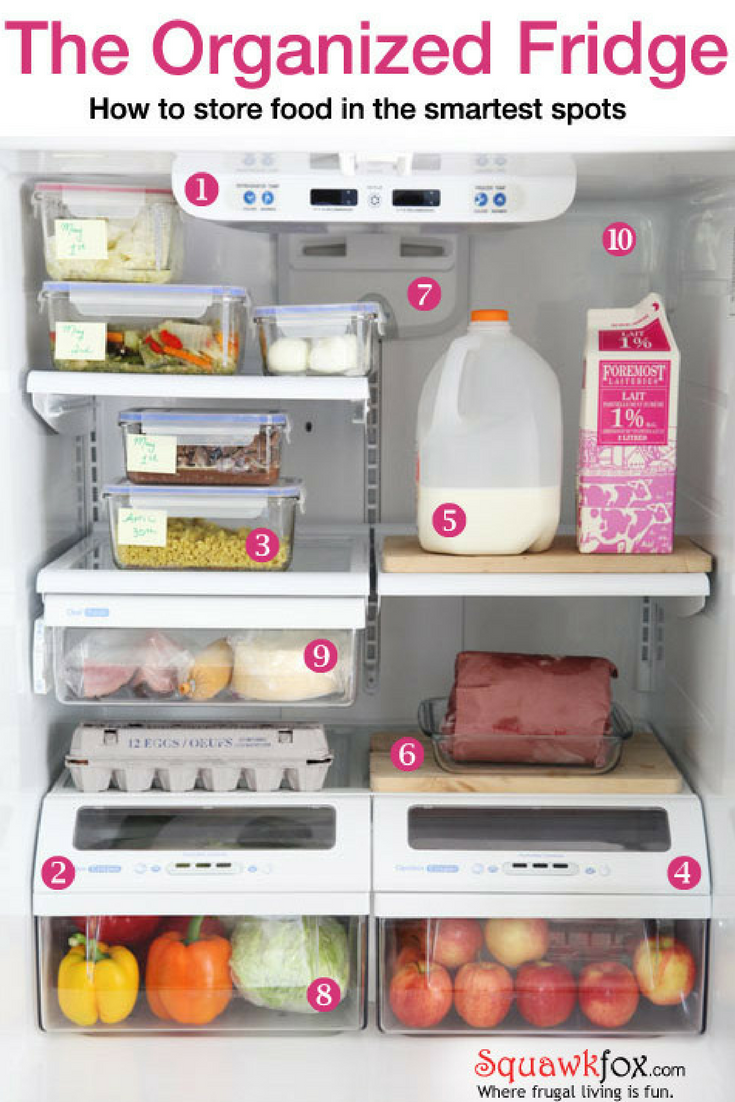
Step Four: Store food in the smartest spots.
There are right and wrong ways to store your meat, milk, and leftovers. Here are the general rules:
1. Keep your cool. Many of us keep our refrigerated food at the wrong temperature. Are you guilty of this chilling offense? Go check your fridge temperature, and set it to 40ºF (5ºC) or below. Any food left in the danger zone (40ºF to 140ºF / 5ºC to 60ºC) is at risk of growing food bacteria which can make you sick! When in doubt, use a thermometer.
2. Are your drawers hot? Hopefully, not too hot. If you have a newer fridge, go on and check the temperature settings on your drawers and crispers.

- Meats and cheeses: Use the Meat or Deli setting to be sure your fridge channels extra cold air (just above freezing) into this space.
- Produce: Are your fruits and vegetables set to the correct humidities? I get this wrong all the time — maybe you do too. Fruits and vegetables should not be mixed in the same crisper, and each drawer needs to be adjusted to the right setting to maintain optimal produce freshness.
3. Beware of the door prize. Don’t place your milk or quick-to-expire perishables in your fridge doors. According to the USDA, door temperatures fluctuate more than any other spot in your fridge, which can lead to food spoilage and sour milk.
4. Meat belongs in the bottom. Place raw meat and seafood on the bottom shelf of your fridge. Relegating animal products below other items won’t help them last longer, but can prevent drips from contaminating food located below. Be sure meat products are wrapped properly, and clean up any spilled juices immediately.
5. Crowds are not allowed. Is your fridge stuffed to the brim? Then it’s time to rethink your stuffed shelving. Air needs to circulate around your food to keep it cool, and an overly stocked fridge can result in warm spots and cool spaces — you’ll end up freezing your lettuce and souring your milk. (Yeah, it never happens the other way around.)
Overstocking solution: Combine like condiments into one jar, remove items that don’t require refrigeration (such as an entire flat of pop), remove the junk (see step one), and freeze your leftovers if they cannot be consumed within four days.
6. Keep it whole. A single big piece of anything will take longer to spoil than many little pieces. For example: A chunk of ham lasts a lot longer than sliced deli meat, and whole apples stay fresh longer than apple wedges. So don’t cut up meat, fruit, or veggies until you’re ready to consume them (unless you’re freezing the lot).
7. Do an ongoing fridge rotation. This step is about moving the older foods hiding in the back of your fridge forward. I do a ‘fridge rotation’ before every grocery trip to see what’s hiding, and hopefully cross an item off our list if it’s already in stock. This step prevents food waste and saves money.
Step Five: Do a refrigerator inventory.
Now that your fridge is in tip-top shape with everything in the perfect place, it’s time to take inventory of what you have chillin’.
Project Organize Refrigerator: Why keep an inventory?
A refrigerator inventory details what you have too much of, warns you when items are about to expire, and may inspire you to make meals with the ingredients you have on hand. Anchovy pizza, anyone?

Free Download: Printable Fridge Inventory (pdf)
Keeping a fridge inventory can help with meal planning and grocery shopping since you’ll know what’s in stock and what needs to be replenished. An up-to-date inventory can also make shopping less wasteful, saving you big money on your grocery budget. Who knows, maybe you can skip a supermarket trip!
What to record:
- Item: What’s in your fridge? List eggs, milk, cheese, juice, condiments, wine, or whatever you chill on a daily basis. Write down the food expiry date in this section for your reference.
- Quantity: How much milk is in stock? Do you have enough leftovers for dinner? Quantity is an ongoing itemization of what you have in stock and what is about to run out. Make sure the kids update this column too!
- Item Cost: You keep your grocery receipts, right? Go ahead and list the money spent on your food. It’s easiest to update when you’ve just done the groceries and stocked your fridge. This column can be a real eye-opener when you add up the total cost of food in your fridge. Those with teenage boys may cry.
Download a copy of my free printable Fridge Inventory and keep it near (or on) your refrigerator so it’s easily updated.
Phew! Now that I’ve cleaned out my fridge for Project Organize Refrigerator, it’s time to tackle my freezer.
Love,
Kerry


Great tips! I’ve had very good success with the Ziploc vegetable bags. My produce lasts much longer, even salad greens, which I’ve had last for up to two weeks!
I use Trello to keep my food inventory. This app is web based and functions on my iPhone as well. I create lists for my groceries, fridge, freezer, pantry, baking supplies, and then my menu plan. After an item is used, I put it back onto the grocery list. Grocery list migrates to the inventory lists. It’s an awesome cycle.
This is an awesome fridge/food inventory guide! I need to buy myself some glass containers like the ones you mentioned (thanks for the suggestions). I’m also wondering if there isn’t something other than Post-It Notes that I can use to label the containers? Knowing my luck, I would keep hitting the notes and knocking them off. I never quite understood how the humidity drawer works, but now I know! Great post 🙂
I love the inventory guide thanks! I actually just throw my fruits and vegetables into the crisper without really thinking about it. I will definitely start putting them in Ziploc bags and keeping them in separate drawers if it will help keep them fresher longer. Thanks again for all the great tips! 🙂
Leftovers never last long enough to need a label with us, hehe. I freeze the extra portions whenever I make spaghetti (or whatever else gets cooked in large quantities) once it cools and they make for great freezer-meals.
You make me want to empty out the contents of my refrigerator and clean it. I’m sure there’s a ton of crap in there that I should throw away, but haven’t because I don’t want to face how much money I’ve wasted.
Good tips for fridge inventory! Thanks for the the information……
Great series – I had no idea how big a problem food spoilage was. My problem is a condiment exploson. 2 kinds of ketchup, 3 mustards and all the speciality items like fish sauce? and asian chili sauce? and so on. One thing I found however that really helps with the produce is tupperware fridge containers. They are specially designed too keep produce in and have air holes and charts on what to put in each. They are expensive to buy, but I can keep lettuce for 3 weeks or more strawberries for at least two.It has really cut down on how much produce I throw out. I think there are other brands, but I have only used the tupperware
Carrie, in the past I’ve used a dry erase marker to write directly on the container. It wipes off most of them fairly easily, and those it doesn’t can be cleaned off using a scrubbie and bit of dish soap before washing.
I take issue with point #8 in the Organized Fridge. Keeping food whole in my home would lead to spoilage because we’re all less likely to reach for food that we have to work for before eating it. If I have, say, a melon, it’s not going to get eaten unless I cut it in chunks or slices. The same goes for a ham; if I want a sandwich, I’d much rather reach for a few slices than a whole one plus a knife.
Even better than using the stainless steel wipes for appliances, use a little mineral oil applied with a soft cloth, then buff, works even better and cheaper too!
Regarding freshness of food – I usually use up leftovers within four days and also think of the old saying
‘If in doubt, throw it out’. Thanks for the tips.
I use baking soda and water in a paste to clean my stainless steel appliances, works better than any branded cleaner I have found.
Wow! What an intensive guide for refrigerator care. Excellent tips on how to save money by battling spoilage and unnecessary waste. You’ve made me self-conscious and now I have to go check my fridge to see if it needs cleaning. 🙂
I really want to buy a vacuum sealer for use in the freezer to keep meats from getting frost on them. Even when I try to squeeze out all of the air in ziplock bags, they still get it. For now, I just write on the bags with a Sharpie and try to rotate the items.
With the Tupperware containers, if you add a drop or two of vinegar, you can keep your cheese indefintely with absolutely no mold growth.
Carrie – You can write on glass with a Sharpie. Rubbing alcohol will take it right off.
Rather than buy expensive food storage containers, I use canning jars. Tall ones for meals and small jam jars for little bits and pieces. They are very cheap, especially if you buy them at garage sales, clear glass so you can see what is in them, and have standard sized lids.
Great info! Luv the glass containers. I wash off and dry any container (ie: milk, cola, juice, etc.) before I put it in my clean frige. Too many people and things have touched them before I brought them home. Luv your common-sense articles.
so much of my fridge is filled with jars and bottles…your fridge looks lovely but the picture didn’t show any dressings, sauerkraut etc…..what to do with all that?
Great ideas, thank you! But I have one suggestion: save your post-it notes, and just write on the glass containers themselves. If you write with a sharpie, it won’t smear off the glass while it’s in the fridge, but it will still be easy to wash off with soapy water and a washcloth or kitchen sponge. If it’s extra stubborn, a quick swipe with rubbing alcohol (or fingernail polish) will do the trick. Just don’t write on plastic containers unless you want it to be permanent 🙂
I actually write right on the refrigerator with a dry erase marker whatever is going into the freezer and the date. Makes inventory very easy. I also write a “garage freezer” inventory on the kitchen one, so I don’t have to be going outside to check what I have, lazy I guess 🙂
Most modern fridges no longer have grills on the back; they’re located under the fridge. To vacuum the dust from them, directly under the front door (just above the floor) you should see a plastic grill. Grasp firmly to remove (they’re attached with a friction catch) and with a crevice tool, vacuum all the loose dust you can reach. Watch that you don’t move the “drip tray” that catches the water from the defrost cycle. While you have the grill off, clean it with warm soapy water and a brush.
[…] Refrigerator Inventory: 5 Steps to a Freshly Frugal Fridge […]
Check some reviews before you invest in an expensive set of glass containers, my GlassLock set didn’t last longer than a year. The containers were still fine, but the lids wouldn’t lock any more.
awesome tips! thanks so much! i’ll be cleaning out my fridge tomorrow 🙂
Thanks for the great tips.
If you remove & wash 1 fridge drawer/shelf at a time, you can easily return it to the favored spot.
To reuse glass or plastic (commercial) containers, I wipe off the date code easily with nail polish remover & a paper napkin (less confusion for other family members).
I store leftover small condiments pkgs. (from the fast food eatery) & yeast packets in a 3″ square container in my fridge door. Small bottles also stand up in these containers.
If I don’t use certain spices weekly, I store the bottles in an uncovered plastic shoe box in my freezer.
Since only 1 family member likes sauerkraut, I freeze the leftover mound in a covered plastic container (labeled S-K).
You can freeze butter, cheese and eggs if you can’t consume them before they spoil. Butter can also be cut into smaller portions and wrapped in foil, then placed in a zipper-bag; otherwise, cover the foil wrapper in plastic wrap.Defrost overnight in the fridge.
Cheese can be frozen in it’s original package from the store, or cut up into smaller portions, then wrapped tightly in plastic wrap.
Eggs can also be frozen; egg whites can be frozen as is, but yolks (or whole eggs) need a dash of salt or sugar to prevent the yolk from congealing when thawed. Never freeze eggs in the shell; ice cube trays are ideal for freezing eggs. Spray them with a non-stick spray (or coat lightly with oil), freeze overnight, and then remove from the trays and store in a freezer bag. If you plan to use them later for omelets or scrambled eggs, add a dash of salt for each egg, if using later for baking, add a pinch of sugar.
Doug Mackenzie, you really are a bit of a genius! Thanks for posting your tips. I thought these were great.
Barbara
I line my crisper drawers with kitchen towels to capture the debris and eliminate the need for cleaning those drawers. When needed, I just replace them with clean towels and toss the others in the laundry. This may not be for everyone, but I have also covered my shelves with the same towels. They capture dampness and drips, preventing those sticky rings under bottles or jugs.
When I freeze leftovers, I line the dish in which they will be heated with foil – enough to fold over the top. Then fill the dish and fold over and seal the foil. The dish is placed in the freezer just long enough to freeze the contents. Then I remove the foil package from the dish and place it inside a freezer ZipLoc bag and back into the freezer it goes. But first I place a strip of regular transparent tape on the front of the bag and use a PENCIL to write the contents on the tape. When that food is removed from the freezer sometime later, I erase the words from the tape and place the bag in a drawer for use another day.
When buying meat, I always place the package inside the plastic bags provided in the meat section to prevent cross contamination. When freezing meat, I place it, still in that store’s plastic bag, inside a used ZipLoc bag with the new contents written on the tape on the front of the bag. I am not concerned about reusing the freezer bags because they never come in contact with any type of food or contamination. I haven’t bought freezer bags in many, many years – I just keep reusing the ones I have.
A final tip……………..
I had to have the rubber seal on my freezer door replaced. It had flattened and stretched in the corner and had splits in the edges. The technician who replaced it advised me to wipe it and the surfaces it touched frequently. He explained the flattened corners cannot be avoided, but the splits were caused by the seal or the surface it touched being sticky. Opening the door caused the seal to stick and be pulled apart. Since then, I wipe the freezer seal and the fridge seal weekly. I don’t want to be spending another $97!
[…] Arranging food properly in the refrigerator also affects how fast it spoils, Taylor said. For example, milk shouldn’t be kept on the door because it isn’t as cold as in the center of the fridge. Set the right humidity level for produce drawers. Keep leftovers near the front of the fridge. […]
The Container Store has these fantastic reusable labels. Once their set, they are dishwasher, microwave & freezer safe. I put them on all my tupperware so labeling’s a breeze & I know how long something’s been in the fridge/freezer & when to eat it.
Last year we picked up the 2.3 liter IKEA 365+ Jar with lid for storing fresh herbs and green onions. We’ve never looked back. In fact, we’ve bought a second. Instead of our herbs going limp and spoiling over a day or two, now, with a few inches of fresh water in the bottom of the jar, we keep fresh parsley, dill, cilantro, green onions, etc. for a week or more, chipping away at the green stuff whenever we want to add flavour to our meals. This simple $8 jar has saved us dozens and dozens of dollars over the year and lets us enjoy fresh herbs all year round.
IKEA 365+ Jar with lid, transparent, white
Article Number: 900.667.08
http://www.ikea.com/ca/en/catalog/products/80066723/#/90066708
Who does’t love an organized fridge? Thanks for such a great visual. The inventory sheet is awesome. Don’t forget to use it for the deep freezer, so things don’t get lost in there. I also use The Container Store reusable labels that CJ mentioned for everything that goes into my freezer. Because after a while, that red mass could be spaghetti sauce or jambalaya. Some of my containers have had the label on for years through regular use.
What is that stone-like platform you have the milk and meat on? Are those small baking stones?
This is so very helpful to me. I think I’ll do a re-org this weekend!
I also use mason jars for storage quite a lot. You can get solid plastic lids for them, which are easier for this purpose than the lids-and-rings you would use for actual canning.
Another tip for labelling — Bernardin now makes dissolving canning labels. You use them just like regular canning labels, but when you wash the empty jars later, the labels just dissolve right off — no sticky residue or paper clumps. I use them for ALL my food labelling now, not just canning. They’re great for labelling and dating leftovers.
I have a question about humidity, my settings just say low or high. Also, the temp in my fridge is only from 1 to 6, 1 being cold, 6 being coldest. It was set at 3 when I got the apartment. What settings should I have for those? Does the high humidity setting mean colder or warmer? Like high humidity or high coldness? What humidity setting should the vegetables be on?
Your fridge should be set at 35F/1.6C. Place any standard thermometer inside your fridge (on a shelf in the middle) for a few hours and you can adjust the setting up or down depending on the reading. Your fridge will be coldest in the back and at the bottom.
Humidity settings are for storing vegetables. Veggies and fruit store better at higher humidity – they won’t dry out as fast.
I would think you could use the blue painters tape and a marker to use on leftover containers. The tape is easy to remove from walls so I would think containers wouldn’t be much different. A roll would last a long time because you don’t need to use big pieces.
This was a great and helpful article. I also use glass canning jars for storing leftovers as well as smaller glass jars for smaller amounts. I try not to ever have my food touch plastic. And also the glass jars don’t take up as much room in the frig.
Hi Kris and Pam, To answer your question — those are plain old wooden cutting boards on the right hand shelves. I use them to protect my shelves. That’s it! Nothing fancy. 🙂
Did anyone every answer Pam’s question from back in July? What are those boards/stones/platforms that are on the bottom and top right hand shelves of the frig???? Do they serve a purpose? With all the great tips and explanations, their presence was completely ignored in the the chart and the article. Just wondering……
My fridge looks pretty, like Kerry’s, because all the condiments are in the door shelves. Peoplejunkie might try this idea. That leaves the main compartment for what there is to eat, now.
Thank you for a great set of Frig and Freezer inventory tools and tips. I really appreciate it.
Love This tutorial…I know what I am doing tomorrow!!! Added tip. Once your fridge is clean line the shelves with Press N Seal Wrap. If you have a spill or a leaky package the Wrap will protect the shelve underneath. Just peel up the wrap and lay down a new sheet.
Composting fridge leftovers.
For some reason Hamilton has freely delivered these Industrial sized “Green Carts” for weekly roll-out to the pickup spot. No-one puts out that much. But if you do, save it. Drill one inch holes in this creature (except the bottom) for air circulation. You now have a Composting Machine. Don’t put animal products in it. Bungee the lid if you have hungry ‘Coons nearby. The City composts it as well…but may sell it back to you, at a three pail limit. You’ll get a lot more out of your own Machine. Just invert it occasionally to let the goodies mix.
Love the picture breakdown of storing items in your fridge! So many little differences that can really make or break your food storage!
Very helpful, thanks so much for sharing:)
Your Photo and editorial was hacked by Lauren Conrad
http://laurenconrad.com/blog/post/operation-organize-the-perfectly-organized-fridge
Thanks Kate for the heads up! I made a mention of this on Twitter. It’s crazy that her people illustrated my refrigerator.
I recommend using an overhead pen to write the date on leftovers
I should definitely declutter my refrigerator. I had no idea that some of the products may die faster in the fridge. This is so interesting! Thank you for the useful information!
Your right about the crying with teenage boys! I spend up $250 per week, just to hear them say (come all other parents join in) ‘There’s nothing to eat around here.’ Then begins the rundown as to what to make. One of our twins went to Alberta to work for the summer and our food bill was half! Our twins are almost 17 yrs and 6ft1 and beanpoles. (not overeating)
Love this article. You answered so many questions I had. Snowing today in CT I know I will be organizing my fridge.
Glass containers are also good because they keep the items colder. Very important! Plastic acts as a barrier.
I discovered this when I was tending to my sick cat and had to feed him raw meat. The glass container helped keep the temperature lower.
thanks for sharing … great work…I recommend using an overhead pen to write the date on leftovers
Great article! Your fridge looks just like ours. Yours must be an LG. My wife went through ours about a month ago. She adding 2 small lazy suzans for bottled condiments to our top shelves and it gave us a lot more space. I was very impressed with what she did. Now can you figure out a good way to organize the freezer? We have stuff just piled in with zero organization.